Visual Flow Editor
Drag-and-drop node-based IVR builder with 8 node types
Whatomate supports WhatsApp voice calling with WebRTC-based audio bridging. Incoming calls are handled by an Interactive Voice Response (IVR) system built using a visual drag-and-drop flow editor. The IVR plays greetings, collects DTMF input, makes HTTP callbacks, and routes callers to agent teams. Agents answer calls from the browser — no phone hardware required.
Visual Flow Editor
Drag-and-drop node-based IVR builder with 8 node types
Call Transfers
Route callers to agent teams with hold music
Call Hold
Put calls on hold with instant hold music and resume anytime
Call Recording
Record agent-caller audio as OGG/Opus, stored in S3
Outgoing Calls
Agents can place outbound calls to contacts from the chat view
IVR flows are configured from Settings > IVR Flows in the admin UI. The editor uses a visual canvas where you drag and drop nodes, then connect them with edges to define the call flow.
Each flow has:
The flow editor provides 8 node types. Drag them from the palette onto the canvas, configure their properties in the side panel, and connect them with edges.
Plays an audio message to the caller. The audio can be uploaded as a file or generated from text using TTS (text-to-speech).
| Property | Description | |----------|-------------| | Audio | Upload an audio file (OGG, MP3, WAV, etc.) — automatically transcoded to Opus | | TTS Text | Type text to generate audio using Piper TTS | | Interruptible | If enabled, the caller can press a digit to skip the greeting |
The greeting node has one output (default) that connects to the next node.
Plays an audio prompt and waits for the caller to press a DTMF digit. Routes the call based on the digit pressed.
| Property | Description |
|----------|-------------|
| Audio / TTS | The prompt audio (e.g., "Press 1 for sales, press 2 for support") |
| Timeout | Seconds to wait for input (default: 10) |
| Max Retries | Number of retries on invalid/no input before following the max_retries edge (default: 3) |
| Options | Digit-to-label mappings (e.g., 1 → "Sales", 2 → "Support") |
Output handles:
digit:1, digit:2, etc. — one per configured optiontimeout — triggered when the caller doesn't press anythingmax_retries — triggered after exhausting all retriesdefault — fallback for unconfigured digitsConnect each output handle to the appropriate next node.
Collects multi-digit input from the caller (e.g., account number, PIN). The collected digits are stored as a context variable for use in subsequent HTTP callbacks.
| Property | Description |
|----------|-------------|
| Audio / TTS | Prompt audio (e.g., "Please enter your account number") |
| Max Digits | Maximum number of digits to collect (default: 10) |
| Terminator | Character that ends input (default: #) |
| Store As | Variable name to store the input (e.g., account_number) |
| Timeout | Seconds to wait for input (default: 10) |
| Max Retries | Retries before following max_retries edge (default: 3) |
Output handles: default, timeout, max_retries
Stored variables can be used in HTTP callback URL and body templates as {{variable_name}}.
Makes an HTTP request to an external API during the call flow. Useful for looking up caller information, validating input, or triggering actions in other systems.
| Property | Description |
|----------|-------------|
| URL | The endpoint URL (supports {{variable}} interpolation) |
| Method | GET or POST |
| Headers | Custom HTTP headers (key-value pairs) |
| Body Template | Request body with variable interpolation (e.g., {"phone": "{{caller_phone}}"}) |
| Timeout | Request timeout in seconds (default: 10) |
| Store Response As | Variable name to store the response body |
Built-in variables available for interpolation:
{{caller_phone}} — the caller's phone number{{call_id}} — the WhatsApp call IDOutput handles: default (continues regardless of response status)
Routes the caller to an agent team. This is a terminal node — it cannot have outgoing edges. Once the transfer starts, hold music plays while agents are notified.
| Property | Description | |----------|-------------| | Team | The agent team to transfer to |
When a transfer executes:
Jumps to a different IVR flow. This is a terminal node. Use this to split complex IVR trees into reusable modules (e.g., a shared "Account Verification" flow).
| Property | Description | |----------|-------------| | Target Flow | The IVR flow to jump to |
The target flow starts from its entry node. The caller's context variables carry over.
Branches the call based on business hours. Configure a weekly schedule with per-day enable/disable and start/end times.
| Property | Description |
|----------|-------------|
| Timezone | IANA timezone (e.g., Asia/Kolkata, America/New_York) |
| Schedule | Per-day enabled/disabled with start and end times |
Output handles:
in_hours — current time is within the configured scheduleout_of_hours — current time is outside the schedulePlays an optional goodbye message and terminates the call. This is a terminal node — it cannot have outgoing edges.
| Property | Description | |----------|-------------| | Audio / TTS | Optional goodbye message |
Below is a screenshot of an example IVR flow built in the visual editor:
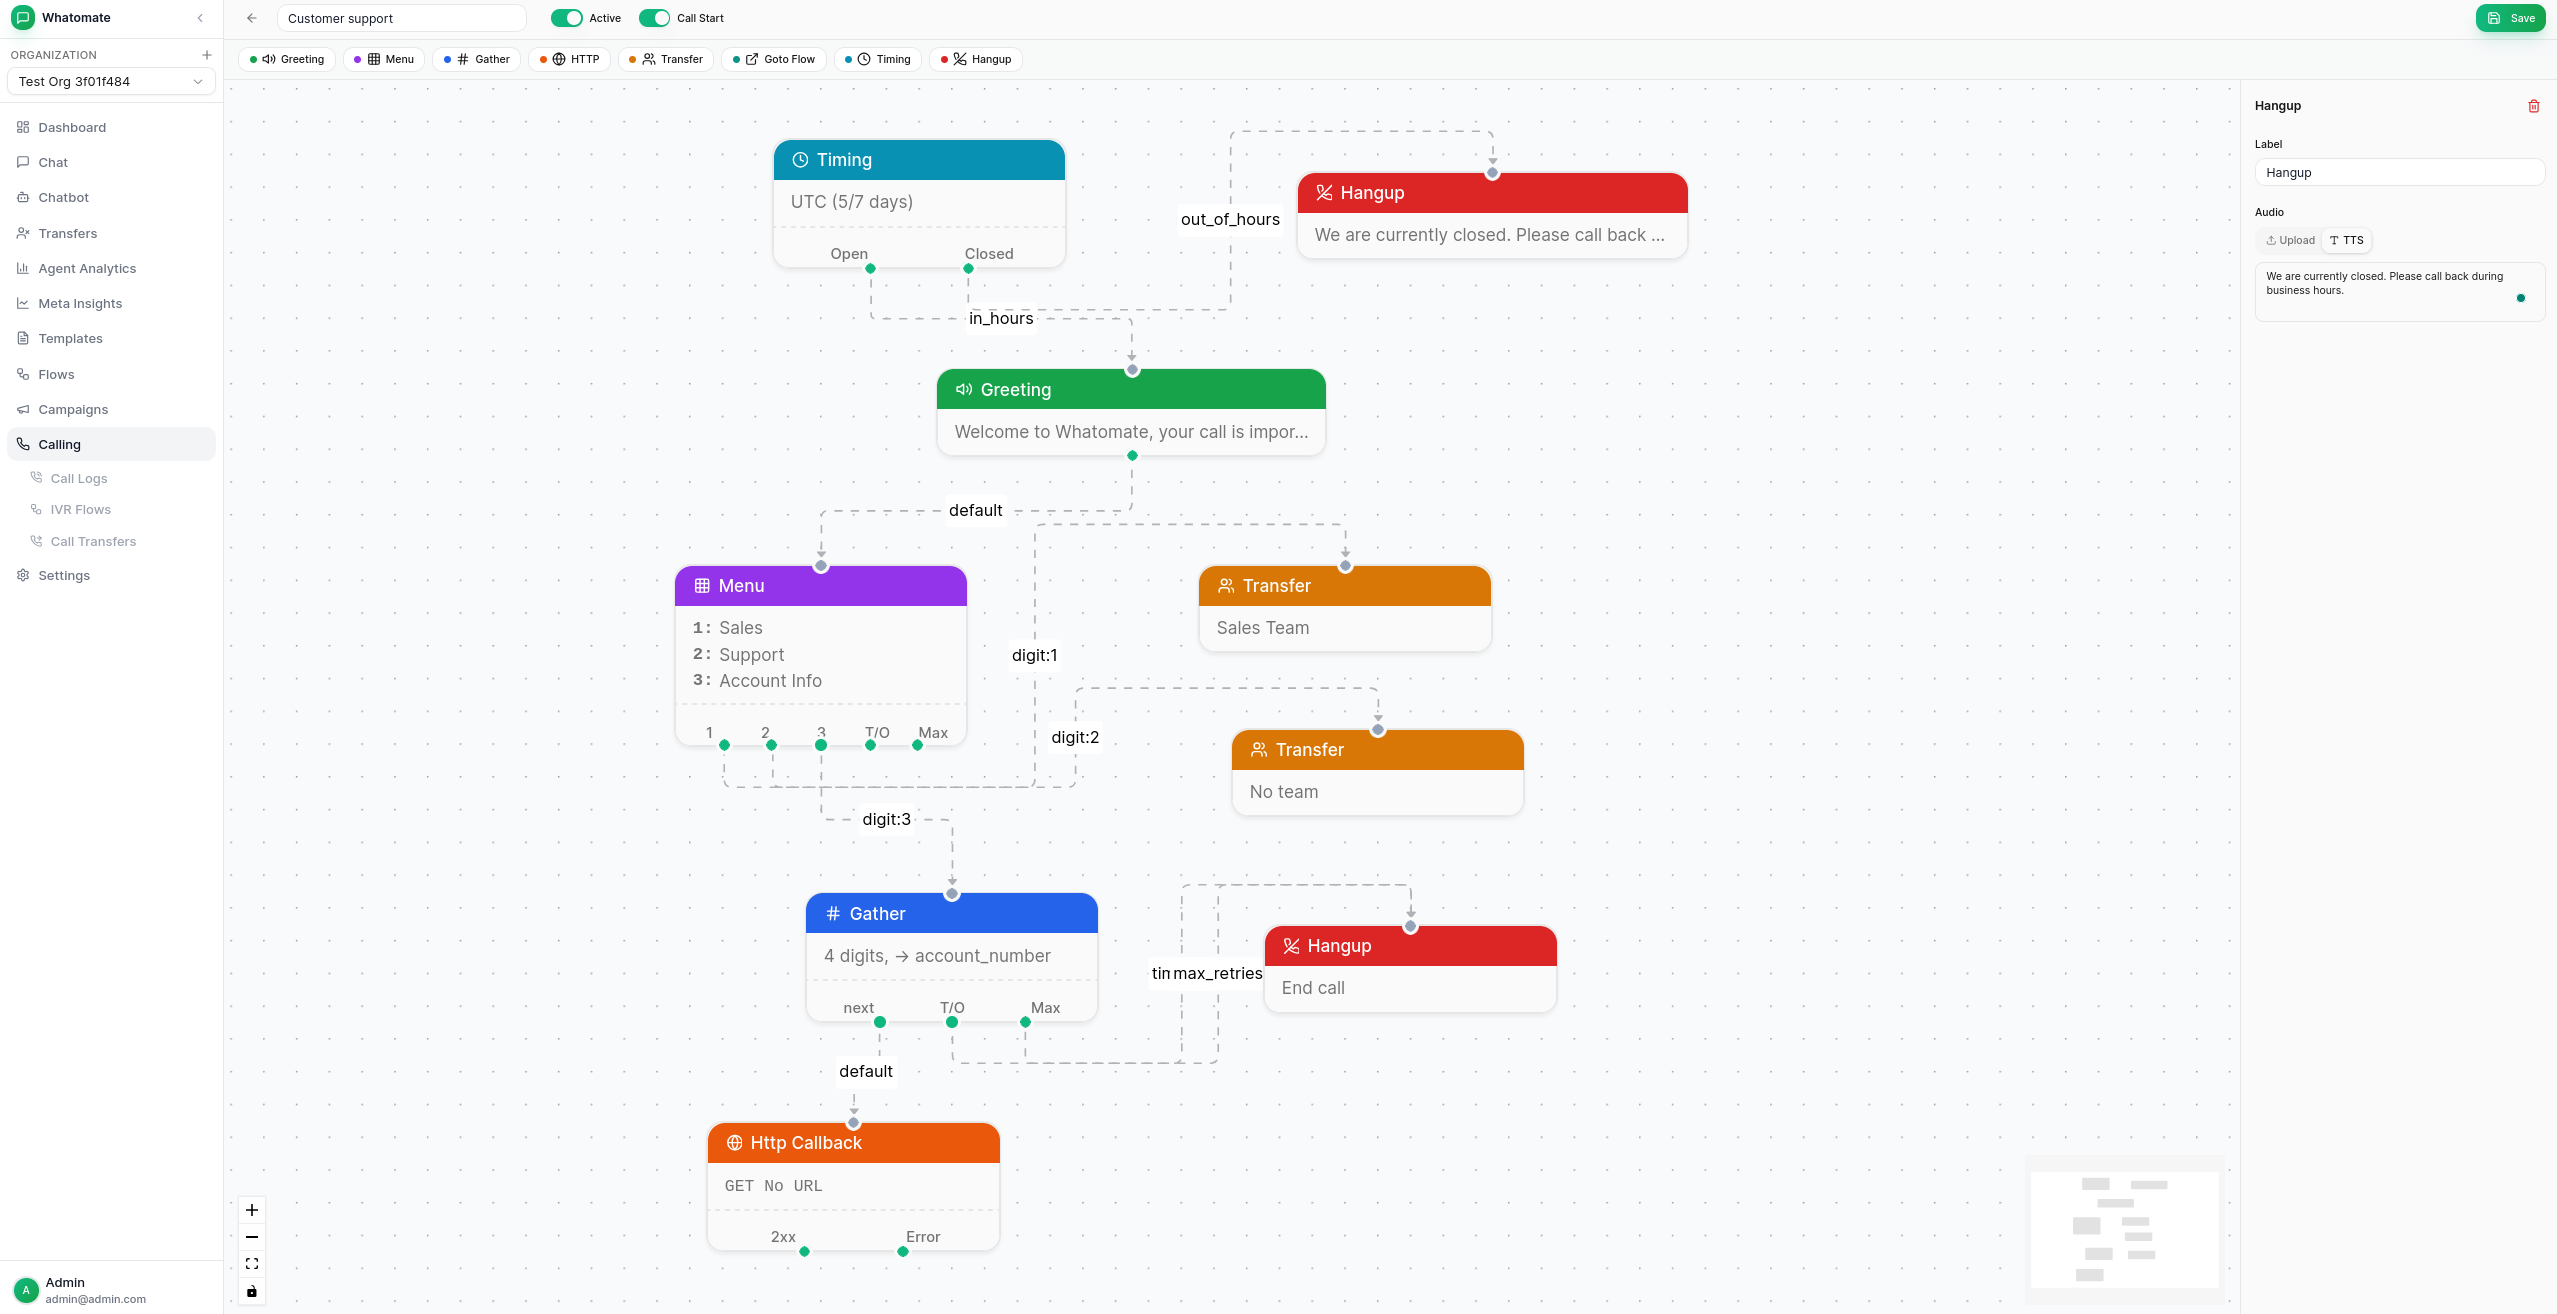
When a caller reaches a Transfer node:
During an active call, agents can put the caller on hold by clicking the Hold button (pause icon) in the call panel. Hold music plays immediately to the caller with seamless audio continuity — no gaps or clicks.
The hold button toggles between pause (hold) and play (resume) icons, with an amber highlight when the call is on hold. The status text in the call panel shows "On Hold" while held.
Hold music is configurable per organization from Settings > Organization > Calling. The default file is set in config.toml via hold_music_file.
When enabled, calls are recorded during the agent-caller bridge phase. Recordings are saved as OGG/Opus files and uploaded to S3.
To enable, add to your config.toml:
[calling]recording_enabled = true
[storage]s3_bucket = "your-bucket"s3_region = "us-east-1"s3_key = "AKIA..."s3_secret = "..."
Recordings are accessible from the call log detail view, which generates time-limited presigned URLs for playback.
All calls (incoming and outgoing) are logged with:
Filter logs by status, direction, account, or IVR flow.
Add to your config.toml:
[calling]audio_dir = "./audio"                  # Directory for IVR audio fileshold_music_file = "hold-music.ogg"     # Hold music file (relative to audio_dir)ringback_file = "ringback.ogg"         # Ringback tone for outgoing callsmax_call_duration = 3600               # Max call duration in secondstransfer_timeout_secs = 120            # Seconds to wait for agent to acceptrecording_enabled = false              # Enable call recording to S3udp_port_min = 10000                   # WebRTC UDP port range startudp_port_max = 10100                   # WebRTC UDP port range endpublic_ip = ""                         # Public IP for NAT (required on cloud/AWS)relay_only = false                     # Force all media through TURN relay
# ICE servers (STUN/TURN) for WebRTC connectivity[[calling.ice_servers]]urls = ["stun:stun.l.google.com:19302"]
[[calling.ice_servers]]urls = ["turn:your-turn-server:3478"]username = "user"credential = "pass"Calling is enabled per-organization in the database. Set calling_enabled = true on the organization record to allow calls for that org.
Whatomate uses Piper for offline text-to-speech generation. When admins type greeting text in the IVR flow editor, the server generates OGG/Opus audio files using Piper + opusenc. This is optional — you can also upload pre-recorded audio files directly.
Piper requires the espeak-ng shared library at runtime, and opusenc is needed to convert WAV output to OGG/Opus:
# Debian/Ubuntusudo apt install espeak-ng opus-tools
# Fedorasudo dnf install espeak-ng opus-tools# Download Piper binary (Linux x86_64)wget https://github.com/rhasspy/piper/releases/download/2023.11.14-2/piper_linux_x86_64.tar.gztar xf piper_linux_x86_64.tar.gzsudo mv piper/piper /usr/local/bin/Piper voices are available at huggingface.co/rhasspy/piper-voices (mirrors at OHF-Voice). Each voice has a .onnx model file and a .onnx.json config file — both are required.
Choosing a voice:
low, medium, and high — medium is a good balance of quality and speeden_US-lessac-medium is recommended (~60MB)mkdir -p /opt/piper/models
# Download model and configwget https://huggingface.co/rhasspy/piper-voices/resolve/main/en/en_US/lessac/medium/en_US-lessac-medium.onnx \ -O /opt/piper/models/en_US-lessac-medium.onnxwget https://huggingface.co/rhasspy/piper-voices/resolve/main/en/en_US/lessac/medium/en_US-lessac-medium.onnx.json \ -O /opt/piper/models/en_US-lessac-medium.onnx.jsonAdd to your config.toml:
[tts]piper_binary = "/usr/local/bin/piper"piper_model = "/opt/piper/models/en_US-lessac-medium.onnx"# opusenc_binary = "opusenc" # defaults to finding in PATHecho "Press 1 for sales, press 2 for support." | piper \ --model /opt/piper/models/en_US-lessac-medium.onnx \ --output_file test.wavopusenc --bitrate 24 test.wav test.ogg# Play: aplay test.wav OR ffplay test.oggFor WebRTC to work, ensure the following ports are open:
| Port | Protocol | Purpose |
|------|----------|---------|
| 10000–10100 | UDP | WebRTC media (configurable via udp_port_min/udp_port_max) |
| 3478 | TCP/UDP | TURN server (if using relay) |